
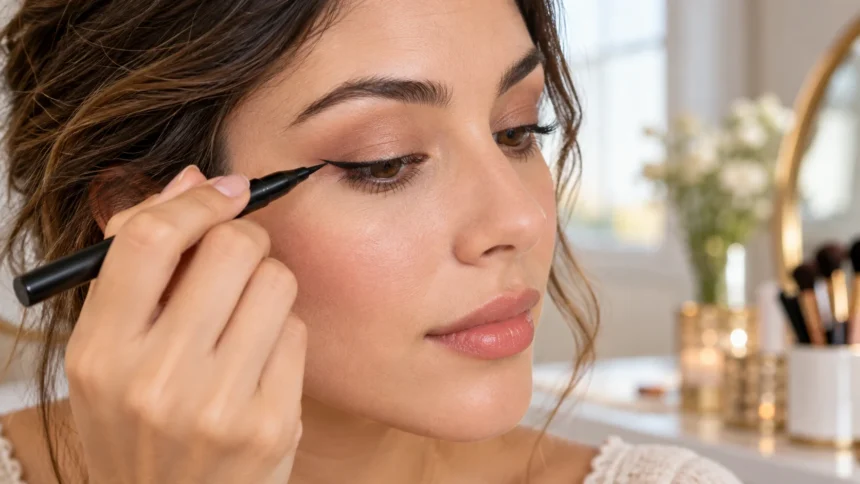
How to Apply Eyeliner for Beginners Without Feeling Overwhelmed
Learning how to apply eyeliner for beginners starts with choosing a manageable product and practicing a simple line close to your upper lashes. You do not need a dramatic wing or perfectly matching eyes on your first attempt. A thin, comfortable application can define your eyes while helping you understand how the product moves across your skin.
Eyeliner can seem difficult because the eyelid is a small surface that moves whenever you blink or change your expression. Applying too much pressure, rushing, or trying to draw one uninterrupted line often makes the process harder. Working in short strokes gives you more control and makes small mistakes easier to correct as you go.
The most useful beginner approach is to build the shape gradually, keeping your eyes relaxed and checking the result regularly. This guide covers product selection, preparation, upper lash application, simple wings, and cleanup. It also explains how to adapt your technique to your eyelids so you can develop a routine that feels comfortable and repeatable.
Choose an Eyeliner That Is Easy to Control
Pencil eyeliner is often a practical starting point because it allows you to work slowly and soften uneven edges. Choose a formula that glides comfortably without requiring heavy pressure against your eyelid. A sharpenable pencil can provide a finer point, while a retractable pencil offers convenience, although some become less precise as the tip wears down.
Liquid eyeliner usually creates a sharper, more defined result, but different applicators behave differently. A felt tip may feel familiar if you like drawing with a pen, while a flexible brush tip responds more noticeably to pressure. Neither is automatically easier for everyone, so consider how steadily you can hold the applicator and control its movement.
Gel eyeliner offers another option, usually applied with a separate brush that determines the thickness of the line. It can suit beginners who prefer placing product in small sections rather than drawing directly from a pen. Start with one product and learn how it behaves before switching repeatedly between formulas, applicators, and techniques during practice.
Pick a Color and Finish That Match Your Goal
Black eyeliner creates strong definition, which can make even a thin line noticeable against the lashes. Brown often produces a softer effect and may feel more forgiving when you are learning to control thickness. Choose the shade according to the look you want rather than assuming that every beginner needs the darkest available color.
The finish also affects how the line appears once the product has dried. Matte eyeliner generally looks less reflective, while glossy or metallic formulas create a more noticeable surface effect. For your first attempts, a straightforward finish can make it easier to judge the shape without shimmer or shine distracting from the outline.
Consider whether you want a crisp line or a softly blended result before choosing a formula. A pencil that stays workable briefly can help you create a smudged lash line, while a fast-setting liquid suits sharper definition. Waterproof and long-wearing products may resist movement better, but they can also require more careful correction and removal.
Prepare Your Eyelids Before Applying Eyeliner
Begin with clean hands and eyelids that are free from leftover makeup and obvious surface oil. If you use moisturizer around the eyes, allow it to settle before applying your liner. A slippery layer can make placement less predictable and may encourage the product to move before it has had time to set.
Apply eyeshadow before eyeliner when your planned look includes both, so powder does not cover the finished line. Keep the eyelid surface smooth and avoid building several thick layers of products underneath the liner. If you use an eye primer, apply a small amount according to its directions rather than assuming more will improve the result.
Check that your eyeliner tip and any brushes you use are clean and ready before you begin. A dry or damaged applicator can create gaps that look like a technique problem when the product is actually responsible. Avoid sharing eye makeup, and stop using a product that causes irritation or has changed noticeably in smell or texture.
Position Your Mirror and Support Your Hand
Place your mirror where you can see the lash line clearly without twisting your neck or leaning awkwardly. Looking slightly downward can help expose the upper lid while allowing you to keep your eye partly open. Good, even lighting makes it easier to judge placement than a strong light coming from only one side.
Support your elbow on a table or another stable surface if your hand feels unsteady. You can also rest part of your hand gently against your cheek, keeping pressure away from the eyeball. Hold the eyeliner comfortably rather than gripping it tightly, because excess tension can make short movements feel less controlled.
Keep your face relaxed and avoid pulling the outer corner of the eye firmly sideways. Stretching the skin can change the shape you are drawing, so the line may look different when you release it. If a fold blocks your view, adjust your head angle or mirror position before trying to force the eyelid into an unfamiliar shape.
Start With Short Strokes Along the Upper Lash Line
Begin near the middle of your upper lash line, where many people find it easier to place the first small stroke. Keep the product on the eyelid skin close to the roots of the lashes. Rather than drawing a long line immediately, create a few short sections and gradually connect them with light, controlled movements.
Work toward the outer corner first, then return to the inner section if you want definition there. You can stop short of the innermost corner, especially while learning, because a full-length line is not necessary for every look. Keep the applicator away from the eye itself and do not force product into uncomfortable or watery areas.
Check the line with your eye open before adding more thickness or extending the shape. A small uneven section is usually easier to repair when the overall line remains thin. Repeat the process on the other eye, aiming for a similar visual effect rather than trying to make every stroke identical while your eyelids naturally differ.
Keep the Line Thin and Build Definition Gradually
A thin line gives you more flexibility because you can add product where needed without immediately changing the whole shape. Focus first on creating a connected edge near the lashes rather than a bold band across the eyelid. This approach works particularly well when you have limited visible lid space or prefer a subtle everyday look.
If you want slightly more definition, increase thickness gradually toward the outer part of the eye. Use small additions and check the result after each one instead of repeatedly tracing over the entire line. Thickening every section to match one mistake can leave you with a much heavier look than you originally intended to create.
Remember that eyeliner does not need to occupy the same amount of space along the whole lash line. A delicate inner section and slightly fuller outer section can create definition without covering much of the eyelid. Once the basic shape feels comfortable, you can experiment with different widths while keeping the process controlled and easy to correct.
Try a Small Wing Once the Basic Line Feels Comfortable
A beginner wing is simply a short extension beyond the outer corner, connected to the upper lash line. Start with a small shape rather than a long, sharply angled flick that requires several precise adjustments. Look straight into the mirror with your eyes open and choose a direction that suits how your outer lid naturally sits.
Draw a short guide extending outward and slightly upward, keeping its length modest on your first attempt. Connect the end of that guide back toward the outer section of your upper lash line. Fill any small gap between the two strokes, then inspect the result with your eye open before making the wing larger.
Apply the second wing in stages so you can compare the direction and visible size before either becomes too bold. Exact symmetry may be unrealistic because eyelids and brows often differ slightly from one side to the other. Aim for balance when looking forward, and remove an awkward section instead of continuing to enlarge both wings to compensate.
Adjust Your Technique for Hooded or Uneven Eyelids
Hooded eyelids have a fold that covers some or much of the movable lid when the eyes are open. A line drawn only with the eye closed may become hidden or interrupted once you look forward. Keeping your eyes open while checking placement helps you understand which parts of the eyeliner will actually remain visible.
Use a thin upper lash line if a thicker application takes up too much of the visible lid. For a wing, sketch the outer shape while looking forward, then fill or connect it carefully as needed. Some eyelids require an outline that looks unusual when closed but appears smooth when open, so judge the finished effect in your normal position.
You can also choose a short outer flick or softly blended pencil instead of a large liquid wing. These options often require less adjustment around folds and can still provide attractive definition. Treat eye-shape advice as a starting point rather than a strict rule, because your preferences and individual eyelid structure matter more than a category label.
Use Lower Lash Eyeliner Sparingly at First
Lower lash eyeliner is optional, and many beginner looks work well with definition only on the upper lid. If you want to try it, use a small amount along the skin beneath the outer lower lashes. A soft pencil or a little shadow applied with a suitable brush can create a less rigid effect than liquid eyeliner.
Start on the outer third and blend lightly rather than drawing a dark line across the entire lower lash area. This keeps the application manageable and lets you see whether the extra definition suits your preferred look. Avoid placing makeup inside the eyelid margin or onto the eye itself while experimenting with the lower lash technique.
Consider how lower liner looks together with your upper line, mascara, and any eyeshadow before adding more. Strong definition on both lids can create a heavier result than expected, particularly when everything is dark and sharply outlined. Keep the first version minimal, then adjust the amount during later practice once you understand the overall effect.
Correct Mistakes Without Starting Your Makeup Again
Small mistakes are normal when learning eyeliner, and a clean correction often takes less time than completely restarting. Allow a liquid formula to set before touching a stray mark if wiping it immediately would spread the product. For pencil, you may be able to soften an uneven edge gently with a clean brush while it remains workable.
A cotton swab lightly dampened with an appropriate eye makeup remover can help tidy the outer edge or remove a misplaced stroke. Use a controlled amount so liquid does not run toward your eye or disturb a large area. Follow the remover’s directions and avoid rubbing repeatedly across delicate skin to chase a tiny imperfection.
If cleanup removes some eyeshadow or base makeup, replace that small section before touching up the liner. Let the area dry first, because applying eyeliner over a damp or oily patch can cause another uneven result. Concealer may refine an outer edge, but use it sparingly and avoid relying on thick coverage to hide a large mistake.
Reduce Smudging and Finish the Look With Mascara
Smudging can happen when eyeliner meets moisture, surface oil, skin folds, or repeated touching throughout the day. Begin by checking whether the formula suits your eyelids and whether the surface underneath is too slippery. Changing your preparation or product may help more than applying additional layers of the same liner over an unstable base.
Give liquid and gel formulas time to set according to their directions before blinking firmly or applying another product over them. With pencil, avoid rubbing or blending after it has set if you want a defined line. If transfer keeps happening at the lid fold, try a thinner placement and assess a different formula during a separate practice session.
Curl lashes before applying eyeliner if using the curler afterward tends to disturb the line, then finish with mascara once the liner has set. Apply mascara carefully so its wand does not stamp extra marks onto the lid. Check whether any visible smudges come from the liner or mascara, since identifying the source makes adjustments more effective.
Build Confidence With Short, Consistent Practice
Practice eyeliner when you have time to make adjustments rather than immediately before an important event. A few relaxed attempts can help you learn the pressure, angle, and setting time of your chosen product. Focus on one skill at a time, such as connecting the upper line, keeping it thin, or creating a short outer flick.
Use the same basic technique for several sessions before deciding that it does not work for you. If something repeatedly goes wrong, identify the specific problem rather than treating the whole application as a failure. A skipping pencil, an awkward mirror angle, or a wing drawn with the eye closed each needs a different adjustment.
Take a quick photograph with your eyes open if it helps you compare results and notice useful improvements. Pay attention to comfort and ease as well as appearance, because a routine that feels manageable is more likely to become consistent. Remove eye makeup gently after practice and follow product replacement guidance rather than continuing to use an old formula indefinitely.
Conclusion
Learning how to apply eyeliner for beginners becomes easier when you start with a thin upper lash line and work in short sections. Choose a comfortable product, prepare your eyelids, and position your mirror so you can see without straining. These simple habits give you more control and reduce the pressure to create a perfect result immediately.
Once your basic line feels reliable, experiment with slightly more outer definition or a small wing that suits your eyelids. Check the shape with your eyes open, correct small mistakes early, and avoid adding thickness simply to hide an uneven section. A balanced, wearable look usually comes from careful placement rather than using a large amount of product.
Regular practice helps you discover which applicator, formula, and shape work best for your preferences. Some days a soft pencil line will be enough, while other occasions may suit a sharper finish. Keep the process comfortable and patient, and let your technique develop through manageable adjustments rather than expecting every application to look identical.
FAQs
What Type of Eyeliner Is Easiest for Beginners?
A smooth pencil is often a useful starting point because it allows short strokes and softer corrections. A felt-tip liquid liner may also suit beginners who prefer a crisp line and pen-like control.
Should I Apply Eyeliner Before or After Eyeshadow?
Apply eyeshadow first, then eyeliner, so powder does not cover or dull the finished line. Let the eyeliner set before adding mascara, and check for any marks created during the final steps.
How Can I Keep My Hand Steady While Applying Eyeliner?
Rest your elbow on a stable surface and hold the applicator comfortably without excessive tension. Look slightly downward into the mirror and use short strokes instead of attempting one uninterrupted line across the lid.
Do Beginners Need to Apply Eyeliner to the Waterline?
No, you can define your eyes by applying eyeliner to the eyelid skin along the upper lashes. Waterline application is unnecessary for a beginner routine and can increase the chance of eye irritation.
How Do I Make Both Eyeliner Wings Look Similar?
Create short guides on both eyes before filling either wing, and compare them while looking straight ahead. Aim for visual balance rather than exact duplication, since natural differences in eyelids can affect the shape.